當你有多個外面線路想要同時間對映到內部的某一台Server時,
或許你是為了備援或Load Balance的考量。在RouterOS下你可以很簡單的達成。
首先,我們本次範例的網路架構圖如下,目標是把2條PPPoE對映到內部的那台Server
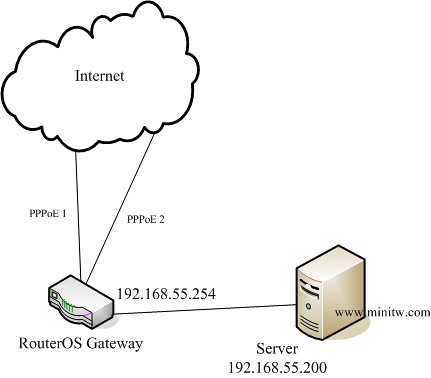
先給大家Script,大家可以再對照下面的圖,不難的
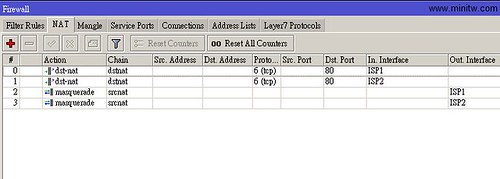
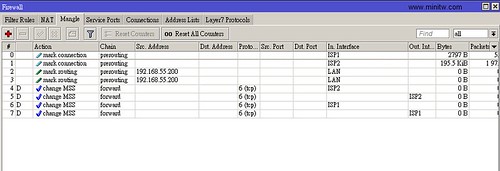
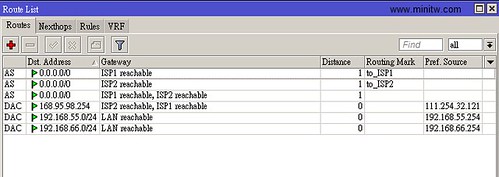
/interface pppoe-client
add ac-name="" add-default-route=no allow=pap,chap,mschap1,mschap2 \
dial-on-demand=no disabled=no interface=LAN max-mru=1480 max-mtu=1480 \
mrru=disabled name=ISP1 password=99999999 profile=default service-name="" \
use-peer-dns=no user=99999999@hinet.net
add ac-name="" add-default-route=no allow=pap,chap,mschap1,mschap2 \
dial-on-demand=no disabled=no interface=LAN max-mru=1480 max-mtu=1480 \
mrru=disabled name=ISP2 password=99999999 profile=default service-name="" \
use-peer-dns=no user=99999999@hinet.net

/ip firewall mangle
add action=mark-connection chain=prerouting disabled=no in-interface=ISP1 \
new-connection-mark=ISP1_conn passthrough=yes
add action=mark-connection chain=prerouting disabled=no in-interface=ISP2 \
new-connection-mark=ISP2_conn passthrough=yes
add action=mark-routing chain=prerouting connection-mark=ISP1_conn disabled=no \
in-interface=LAN new-routing-mark=to_ISP1 passthrough=yes src-address=\
192.168.55.200
add action=mark-routing chain=prerouting connection-mark=ISP2_conn disabled=no \
in-interface=LAN new-routing-mark=to_ISP2 passthrough=yes src-address=\
192.168.55.200

/ip firewall nat
add action=dst-nat chain=dstnat disabled=no dst-port=80 in-interface=ISP1 \
protocol=tcp to-addresses=192.168.55.200 to-ports=80
add action=dst-nat chain=dstnat disabled=no dst-port=80 in-interface=ISP2 \
protocol=tcp to-addresses=192.168.55.200 to-ports=80
add action=masquerade chain=srcnat disabled=no out-interface=ISP1
add action=masquerade chain=srcnat disabled=no out-interface=ISP2

/ip route
add disabled=no distance=1 dst-address=0.0.0.0/0 gateway=ISP2 routing-mark=\
to_ISP2 scope=30 target-scope=10
add disabled=no distance=1 dst-address=0.0.0.0/0 gateway=ISP1 routing-mark=\
to_ISP1 scope=30 target-scope=10
add disabled=no distance=1 dst-address=0.0.0.0/0 gateway=ISP2,ISP1 scope=30 \
target-scope=10
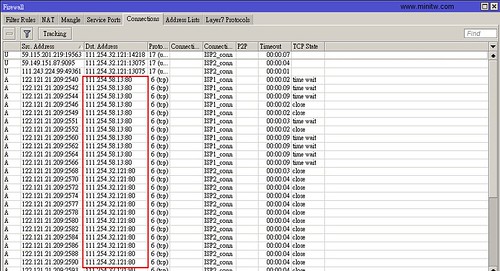
最後我們實驗一下,確認2個外面的IP都連的進來,並且對映到內部的同一個IP位置,收工
參考資料:Manual:PCC
Dear 茶包兄:
想請問一下,類似這種雙WAN的設定,在 /interface pppoe-client 這段裡面的「interface=LAN」不是應該指哪個實體port嗎? 還是我誤解了?
如果你是指第3行的那段的話,那代表是「這個pppoe要從那一個interface撥號出去」
我目前使用 RB450G, 目前卡在單線多IP多LAN, 單線多IP, 只能撥出一個 pppoe-out1
剩下的就撥不出去了. 還有 DMZ 設定.
大大可以發表一下嗎? 小弟考慮送一台 RB450G 給大大研究. 但是要發表 單線多IP 多LAN完整設定圖解. 方便家中有玩遊戲的玩家,
RB450G 跟 3300B+ 設定真的差好多. 但是, 我喜歡 RB450G Firewall. 高達49000session.
我覺得 WinBox 中 Tx/Rx 部份好像錯了, Tx:transmission傳送, Rx:Receive接受
WinBox 好像相反了. 可以跟立誠反應嗎?
我想你可以先確認你的ISP是否允許單一帳號多重撥接PPPoE,如果ISP說不行,那也玩不下去了。
DMZ的話,你可以先參考這篇
在RouterOS中加入Port Mapping
http://www.minitw.com/archives/702
ROS的入門門檻較高,不過上手後,很難再找到這麼方便設定又便宜的Router了
也許你可以把設定過程中遇到的問題,提出來,大家來討論
我現在問題, ether2-local 到ether5-local, 都用default bridge, 每個 ether?-local 都是一台電腦, 沒接 Hub, 都可以直接上網, 但是在Windows 網路上芳鄰看不到對方,
請問有沒有辦法可以解決?? 是在 firewall 還是 bridge 做?
我記的手冊說 ether2-local 到ether5-loca 是同一個LAN.
感謝.
ether1-pppoe 是出去的.
把Port切成Switch的模式試試看
http://wiki.mikrotik.com/wiki/Manual:Switch_Chip_Features
感謝,
還有如果要內定 192.168.88.1 改成 192.168.0.1
就變更 192.168.88.x 變成 192.168.0.x
我改了IP->Address, DHCP Server, 結果無法上網了.
連 Ping 168.95.1.1 都不行了.
192.168.0.x 是我原先電腦設定好的, 一改 RB450G 我就不用改電腦資料了.
ROS改了之後,記得電腦端的IP要更新一下。cmd -> ipconfig /renew
大大,請問您目前現在是用 RB450G or RB750G??
我目前有多一台 RB450G 可以給大大研究. 不知大大有無興趣?
單線多IP, 我在 Vigor 2920 成功了. RB450G 無法成功…
目前我使用的是RB750。理論上ROS應該是一樣的操作方式
不知道你說的單線多IP是為了要讓內部電腦出去用(內對外)?
還是讓外面的電腦連進來(外對內)?
如果同一條線路同一個ISP,在Vigor 2920上做的到,RB450G也可以做的到
也許你可以把設定檔貼上來,大家研究一下。一台RB450G也是不便宜的
茶包兄: 請教一下,我依照您的設定已經成功的完成了2wan的設置. Thank you very much! 可是另一個問題來了,我的PPTP VPN只要是2WAN enabled,就撥不進去,將其中一個WAN disable, 就可以撥進來! 這…..是要還缺哪邊的設定呢? Thanks again!
這個是因為啟用PPTP VPN是走input與output這2個firewall chain
所以你必需告訴ROS,走那條ISP線路進來的,就走那條ISP線路回去
不然的話,就是進的來,但是回不去。
而你說的關掉另1個就可以了,是因為當只剩1條對外的連線時,進出就全部走這條了
多WAN的情況下,封包的來回是會比較複雜一點
要解決這情況你可以加上以下的rule,這樣子2條線路都可以提供ROS的服務了
不過請注意,這樣會引發安全性的問題,就是你整台ROS的服務外面都可以連的到了
比較好的做法是針對有使用到的Port去開放就好,這部份就留給你研究吧,不難的
/ip firewall mangle
add action=mark-connection chain=input comment=”” connection-state=new \
disabled=no in-interface=ISP1 new-connection-mark=ISP1_conn passthrough=\
yes
add action=mark-routing chain=output comment=”” connection-mark=ISP1_conn \
disabled=no new-routing-mark=to_ISP1 passthrough=no
add action=mark-connection chain=input comment=”” connection-state=new \
disabled=no in-interface=ISP2 new-connection-mark=ISP2_conn passthrough=\
yes
add action=mark-routing chain=output comment=”” connection-mark=ISP2_conn \
disabled=no new-routing-mark=to_ISP2 passthrough=no
茶包兄:
謝謝您的回覆,您是不是指在firewall rule中只開放必要的port (GRE + 1723)就好了呢? 這樣是不是就不會有您說的安全性的問題?
我找到了另一個方法,不過不確定會不會有其他的影響(應該是不會吧!!不確定 🙂 )
您的最後一個route的設定是
add disabled=no distance=1 dst-address=0.0.0.0/0 gateway=ISP2,ISP1 scope=30 \target-scope=10
我改成兩個設定(將兩個Gateway的distance設定設為不同)
add disabled=no distance=1 dst-address=0.0.0.0/0 gateway=ISP1 scope=30 \target-scope=10
add disabled=no distance=2 dst-address=0.0.0.0/0 gateway=ISP2 scope=30 \target-scope=10
這樣就可以了~~
不知道您知不知道為什麼這樣設定就可以work?
的確安全性的問題就是像你所說的,只要開放必要的port與協定既可。
另外我剛試了一下,不加上我上個回覆說的mangle,似乎是不行。
你看一下你的方法設完後,route是否有變藍色,如果是有變藍色,表示該行無作用
或是你可以把你的設定貼上來,大家研究一下(PPPoE請注意去掉帳密)
下面3行是把設定指令輸出
/interface pppoe-client export
/ip firewall export
/ip route export
茶包兄: 您說的沒錯,那個routing rule是藍色的 🙁
我先貼上我的設定
/interface pppoe-client
add ac-name=”” add-default-route=no allow=pap,chap,mschap1,mschap2 \
dial-on-demand=no disabled=no interface=WAN1 max-mru=1480 max-mtu=1480 \
mrru=disabled name=”Hinet-Fixed IP” password=xxxxxxxx profile=default \
service-name=”” use-peer-dns=yes user=xxxxxxxx@ip.hinet.net
add ac-name=”” add-default-route=no allow=pap,chap,mschap1,mschap2 \
dial-on-demand=no disabled=no interface=WAN2 max-mru=1480 max-mtu=1480 \
mrru=disabled name=”Hinet-Dyn IP” password=xxxxxxxx profile=default \
service-name=”” use-peer-dns=yes user=xxxxxxxx@hinet.net
/ip firewall filter
add action=accept chain=input comment=”Allow PPTP” disabled=no dst-port=1723 protocol=tcp src-address-type=””
add action=accept chain=input disabled=no protocol=gre
add action=accept chain=input comment=”Allow Established connections” connection-state=established disabled=no
add action=drop chain=input comment=”Drop Invalid connections” connection-state=invalid disabled=no
add action=accept chain=input comment=”Allow ICMP” disabled=no protocol=icmp
add action=accept chain=input comment=”Allow Internal IP” disabled=no src-address=192.168.1.0/24
add action=accept chain=forward comment=”Allow Forward Connections” connection-state=new disabled=no
add action=drop chain=input comment=”Drop everything else” disabled=no
/ip firewall mangle
add action=mark-connection chain=prerouting comment=”2Wan Setting” connection-state=new disabled=no in-interface=”Hinet-Fixed IP” new-connection-mark=”Hinet-Fixed IP” passthrough=yes
add action=mark-connection chain=prerouting connection-state=new disabled=no in-interface=”Hinet-Dyn IP” new-connection-mark=”Hinet-Dyn IP” passthrough=yes
add action=mark-routing chain=prerouting connection-mark=”Hinet-Fixed IP” disabled=no in-interface=ether3-local new-routing-mark=”To Hinet-Fixed IP” passthrough=yes
add action=mark-routing chain=prerouting connection-mark=”Hinet-Dyn IP” disabled=no in-interface=ether3-local new-routing-mark=”To Hinet-Dyn IP” passthrough=yes
add action=mark-routing chain=prerouting comment=”216 ubuntu routing mark” disabled=no new-routing-mark=”To Hinet-Dyn IP” passthrough=no src-address=192.168.1.216
/ip firewall nat
add action=dst-nat chain=dstnat comment=”216 P2P” disabled=no dst-port=4770 in-interface=”Hinet-Dyn IP” protocol=tcp to-addresses=192.168.1.216 to-ports=4770
add action=dst-nat chain=dstnat disabled=no dst-port=4775 in-interface=”Hinet-Dyn IP” protocol=tcp to-addresses=192.168.1.216 to-ports=4775
add action=dst-nat chain=dstnat disabled=no dst-port=4776 in-interface=”Hinet-Dyn IP” protocol=udp to-addresses=192.168.1.216 to-ports=4776
add action=dst-nat chain=dstnat disabled=no dst-port=4778 in-interface=”Hinet-Dyn IP” protocol=udp to-addresses=192.168.1.216 to-ports=4778
add action=masquerade chain=srcnat comment=Default disabled=no out-interface=”Hinet-Fixed IP”
add action=masquerade chain=srcnat disabled=no out-interface=”Hinet-Dyn IP”
add action=masquerade chain=srcnat disabled=no
/ip firewall service-port
set ftp disabled=no ports=21
set tftp disabled=no ports=69
set irc disabled=no ports=6667
set h323 disabled=no
set sip disabled=no ports=5060,5061
set pptp disabled=no
/ip route
add disabled=no distance=1 dst-address=0.0.0.0/0 gateway=”Hinet-Fixed IP” routing-mark=”To Hinet-Fixed IP” scope=30 target-scope=10
add disabled=no distance=1 dst-address=0.0.0.0/0 gateway=”Hinet-Fixed IP” routing-mark=”To Hinet-Dyn IP” scope=30 target-scope=10
add disabled=no distance=1 dst-address=0.0.0.0/0 gateway=”Hinet-Fixed IP,Hinet-Dyn IP” scope=30 target-scope=10
ip firewall filter只allow internal ip以及GRE + 1723
ip firewall mangle 前四條是根據您的建議加的,最後一條是要讓216的ip從dyn-ip 傳出
ip firewall nat 前四條是設定emule用的
我這樣子設定, PPTP還是進不來 🙁
Sorry! 貼了之後馬上就發現router 設定錯了,已經更正,可是還是不work
/ip route
add disabled=no distance=1 dst-address=0.0.0.0/0 gateway=”Hinet-Fixed IP” routing-mark=”To Hinet-Fixed IP” scope=30 target-scope=10
add disabled=no distance=1 dst-address=0.0.0.0/0 gateway=”Hinet-Dyn IP” routing-mark=”To Hinet-Dyn IP” scope=30 target-scope=10
add disabled=no distance=1 dst-address=0.0.0.0/0 gateway=”Hinet-Fixed IP,Hinet-Dyn IP” scope=30 target-scope=10
茶包兄: 我找到問題了,果然可以匯出script , 一compare就知道問題出在哪
我的mangle都是用prerouting, 改為您說的input, output就可以了! Thank you very very much!
/ip firewall mangle
add action=mark-connection chain=input comment=”2Wan Setting” connection-state=new disabled=no in-interface=”Hinet-Fixed IP” new-connection-mark=”Hinet-Fixed IP” passthrough=yes
add action=mark-routing chain=output connection-mark=”Hinet-Fixed IP” disabled=no new-routing-mark=”To Hinet-Fixed IP” passthrough=no
add action=mark-connection chain=input connection-state=new disabled=no in-interface=”Hinet-Dyn IP” new-connection-mark=”Hinet-Dyn IP” passthrough=yes
add action=mark-routing chain=output connection-mark=”Hinet-Dyn IP” disabled=no new-routing-mark=”To Hinet-Dyn IP” passthrough=no
add action=mark-routing chain=prerouting connection-mark=”Hinet-Fixed IP” disabled=no in-interface=ether3-local new-routing-mark=”To Hinet-Fixed IP” passthrough=yes
add action=mark-routing chain=prerouting connection-mark=”Hinet-Dyn IP” disabled=no in-interface=ether3-local new-routing-mark=”To Hinet-Dyn IP” passthrough=yes
add action=mark-routing chain=prerouting comment=”216 ubuntu routing mark” disabled=no new-routing-mark=”To Hinet-Dyn IP” passthrough=no src-address=192.168.1.216
這幾天比較快,一直沒有上來看一下
恭喜解決問題,有問題的話,再一起討論呀
不好意思又來打擾了,我已經照上面設定成功把兩條wan都導回Lan同一台Server,現在比較奇怪的是,只有ftp不能動,下面是我的設定,可否煩請各位高手幫我看看可能是哪邊出問題嗎?
add ac-name=”” add-default-route=yes allow=pap,chap,mschap1,mschap2 \
dial-on-demand=no disabled=no interface=ether1-gateway max-mru=1480 \
max-mtu=1480 mrru=disabled name=seednet password=xxxxx profile=default \
service-name=”” use-peer-dns=yes user=xxxxxx#
add ac-name=”” add-default-route=no allow=pap,chap,mschap1,mschap2 \
dial-on-demand=no disabled=no interface=ether2-backup max-mru=1480 \
max-mtu=1480 mrru=disabled name=hinet password=xxxxx profile=default \
service-name=”” use-peer-dns=no user=xxxxx@hinet.net
ip firewall connection tracking
set enabled=yes generic-timeout=10m icmp-timeout=10s tcp-close-timeout=10s \
tcp-close-wait-timeout=10s tcp-established-timeout=1d \
tcp-fin-wait-timeout=10s tcp-last-ack-timeout=10s \
tcp-syn-received-timeout=5s tcp-syn-sent-timeout=5s tcp-syncookie=no \
tcp-time-wait-timeout=10s udp-stream-timeout=3m udp-timeout=10s
/ip firewall filter
add action=accept chain=input comment=”default configuration” disabled=no \
protocol=icmp
add action=accept chain=input comment=”default configuration” \
connection-state=established disabled=no in-interface=ether1-gateway
add action=accept chain=input comment=”default configuration” \
connection-state=related disabled=no in-interface=ether1-gateway
add action=drop chain=input comment=”default configuration” disabled=yes \
in-interface=ether1-gateway
/ip firewall mangle
add action=mark-connection chain=prerouting disabled=no in-interface=seednet \
new-connection-mark=ISP1_conn passthrough=yes
add action=mark-connection chain=prerouting disabled=no in-interface=hinet \
new-connection-mark=ISP2_conn passthrough=yes
add action=mark-routing chain=prerouting connection-mark=ISP1_conn disabled=\
no in-interface=ether3-local new-routing-mark=to_ISP1 passthrough=yes \
src-address=192.168.88.253
add action=mark-routing chain=prerouting connection-mark=ISP2_conn disabled=\
no in-interface=ether3-local new-routing-mark=to_ISP2 passthrough=yes \
src-address=192.168.88.253
/ip firewall nat
add action=dst-nat chain=dstnat disabled=no dst-port=3389 in-interface=\
seednet protocol=tcp to-addresses=192.168.88.253 to-ports=3389
add action=dst-nat chain=dstnat disabled=no dst-port=80 in-interface=seednet \
protocol=tcp to-addresses=192.168.88.253 to-ports=80
add action=dst-nat chain=dstnat disabled=no dst-port=45631 in-interface=\
seednet protocol=udp to-addresses=192.168.88.253 to-ports=45631
add action=dst-nat chain=dstnat disabled=no dst-port=45631 in-interface=\
seednet protocol=tcp to-addresses=192.168.88.253 to-ports=45631
add action=dst-nat chain=dstnat disabled=no dst-port=20 in-interface=seednet \
protocol=tcp to-addresses=192.168.88.253 to-ports=20
add action=dst-nat chain=dstnat disabled=no dst-port=21 in-interface=seednet \
protocol=tcp to-addresses=192.168.88.253 to-ports=21
add action=dst-nat chain=dstnat disabled=no dst-port=8080 in-interface=\
seednet protocol=tcp to-addresses=192.168.88.27 to-ports=8080
add action=dst-nat chain=dstnat disabled=no dst-port=8888 in-interface=\
seednet protocol=tcp to-addresses=192.168.88.253 to-ports=8888
add action=dst-nat chain=dstnat disabled=no dst-port=8888 in-interface=\
seednet protocol=udp to-addresses=192.168.88.253 to-ports=8888
add action=dst-nat chain=dstnat disabled=no dst-port=1863 in-interface=\
seednet protocol=tcp to-addresses=192.168.88.253 to-ports=3389
add action=dst-nat chain=dstnat disabled=no dst-port=8090 in-interface=\
seednet protocol=tcp to-addresses=192.168.88.253 to-ports=8090
add action=dst-nat chain=dstnat disabled=no dst-port=5900 in-interface=\
seednet protocol=tcp to-addresses=192.168.88.3 to-ports=5900
add action=dst-nat chain=dstnat disabled=no dst-port=80 in-interface=hinet \
protocol=tcp to-addresses=192.168.88.253 to-ports=80
add action=dst-nat chain=dstnat disabled=no dst-port=3389 in-interface=hinet \
protocol=tcp to-addresses=192.168.88.253 to-ports=3389
add action=dst-nat chain=dstnat disabled=no dst-port=20 in-interface=hinet \
protocol=tcp to-addresses=192.168.88.253 to-ports=20
add action=dst-nat chain=dstnat disabled=no dst-port=21 in-interface=hinet \
protocol=tcp to-addresses=192.168.88.253 to-ports=21
add action=masquerade chain=srcnat comment=”default configura
no out-interface=seednet
add action=dst-nat chain=dstnat disabled=no dst-address=114.4
dst-port=45631 protocol=tcp to-addresses=192.168.88.253 t
/ip route
add disabled=no distance=1 dst-address=0.0.0.0/0 gateway=seed
routing-mark=to_ISP1 scope=30 target-scope=10
add disabled=no distance=1 dst-address=0.0.0.0/0 gateway=hine
to_ISP2 scope=30 target-scope=10
add disabled=no distance=1 dst-address=0.0.0.0/0 gateway=hine
30 target-scope=10
FTP Client的連線方式也有關係,你可以試試Filezilla FTP Client看看
使用20、21 Port的話,應該是FTP 的主動模式(active)
如果不確定的話可以讓軟體自已判斷
看看是卡在那邊,連的進去目錄list不出來?還是連都連不進去?
我直接用command的ftp,連都連不進去,兩條線都一樣,不知道是被什麼東西擋掉了,最奇怪的是,rdp,http等等其他都正常,只有改成dual wan以後兩條線ftp一起死
很神奇的reboot以後,主線的ftp好了,IIS ftp預設沒有PASV,所以我現在從主線用no PASV的ftp client可以連進去,但是從第二條線用ftp client不管是有無開啟PASV都進不去,list出不來,可是我20跟21明明都有mapping過去..
重新做了一次port mapping,用filezilla可以連進去了,但是很神奇的是,我從hinet(ISP2)的那個ip ftp連進去,結果流量是從seednet(ISP1)回來的,ISP2居然沒有流量..
應該是不會發生從hinet進去,走seednet回來的狀況。可能是設定有問題。試試用IP直接連,不要用domain name連
可能是因為我的hinet那條沒有指定路由,我只讓他從wan mapping到lan,所以當ftp出去的時候他從default的seednet那條線走回去了,不過這樣也會通喔..XD
因為我抓檔的時候發現居然有1.1mbytes,hinet那條只有12/3,根本不可能跑出這種速度,打開winbox才發現就算我用副線路連ftp回去,丟出來也是走主線路的流量,很特別的是http or RDP這類都是正常的
打擾各位大大了.. 小分是ros 新手
現在想弄一台pptp 服務器主要用來給自己和朋友在大陸工作時”翻牆”的
剛訂下了 rb450g 準備好了兩條線路 一條dhcp 100mb 另一條 pppoe 100mb 的
在虛擬機內搞了很久 搞不定雙線呢..
希望是兩條線路 那條進來也由那條出去 兩條線路都接到內網同一部服務器上.
即是由 a 線連進來的pptp 也由a 線走出去 b 線進來的也由b 線出去
不知道該怎麼設定呢?
這個問題的關鍵在於/ip firewall mangle
可以設定為A線路進來的就打上「A_Connection」這個標記(mark connection)
然後也在/ip route裡面設定當發現有「A_Connection」就走A線路的Gateway出去
如果還有不懂的地方可以提出來,大家一起討論
雙線路中用adsl pppoe 的那一條 gateway 直接指定名稱是可以的
另但另一條要dhcp 拿取ip 位置的線路gateway 指定名稱就不通了 要自己填上gateway 的ip , 有什麼辦法能解決嗎?
/add disabled=no distance=1 dst-address=0.0.0.0/0 gateway=ISP1 routing-mark=\
to_ISP1 scope=30 target-scope=10
/ip route
add disabled=no distance=1 dst-address=0.0.0.0/0 gateway=ISP2 routing-mark=\
to_ISP2 scope=30 target-scope=10
add disabled=no distance=1 dst-address=0.0.0.0/0 gateway=ISP1 routing-mark=\
to_ISP1 scope=30 target-scope=10
add disabled=no distance=1 dst-address=0.0.0.0/0 gateway=ISP2,ISP1 scope=30 \
target-scope=10
現在我兩條線路都被轉成 dhcp 了 而且每次都派不同ip 給我
gateway 不能直接像pppoe 指定 isp1 或 2 就通呢
在網上只找到 pppoe 的指定方法,dhcp 實在不知道怎麼解決呢
如在 dhcp client 不勾選 default route, 又不手動添加 ???.???.???.254 進去不通
而ip 又經常被強制改變 實在頭痛呢.
RB450G] /ip route> print
Flags: X – disabled, A – active, D – dynamic,
C – connect, S – static, r – rip, b – bgp, o – ospf, m – mme,
B – blackhole, U – unreachable, P – prohibit
# DST-ADDRESS PREF-SRC GATEWAY DISTANCE
0 A S 0.0.0.0/0 ISP1 1
1 A S 0.0.0.0/0 ISP2 1
2 ADS 0.0.0.0/0 168.70.26.254 2
3 DS 0.0.0.0/0 169.60.42.254 3
4 ADC 168.70.26.0/24 168.70.26.85 ISP2 0
5 ADC 169.60.42.0/24 168.60.42.20 ISP1 0
6 ADC 192.168.88.0/24 192.168.88.1 LAN 0
找到方法了 只能用script 自動加上 唉
想不到竟然pppoe 會方便呢
這可凶的pppoe 是以前非常討厭的
茶包大,
有個問題請教您一下,
RB450G有5個Ethernet Port,分別是Ether1~Ether5,
如果將Ether1 & Ether2分別設定成WAN1及WAN2,Ether3設定成LAN1,
WAN1/WAN2使用PPPoE的方式撥接二條獨立的VDSL,那麼能夠將LAN1設定成2個IP位址來當Gateway,這2個IP位址分別指向WAN1及WAN2做NAT連接Internet嗎?
也就是說用戶端的電腦要從那一個WAN端口連出去決定在用戶端電腦的Gateway設定上。
謝謝!
to Himalayas
你說的可以做的到,但不用這麼複雜
對於LAN1裡面的PC而言,Gateway只有1個
至於說封包到ROS後,要走那一條VDSL出去,則在是ROS中處理就可以了
例如:來源IP是192.168.1.1~192.168.1.20 就走VDSL1出去,其他的就走VDSL2出去…..等等之類的
總結以上的資訊就是:LAN1的Gateway IP,就統一只有1個。而要走那一條VDSL出去,則是在ROS裡面控制
茶包兄,拜讀你的文章, 真的受益良多, 在下最近剛入手RB750GL, 有個設定問題, 冒味想請教一下茶包兄,
我有 pppoe relay (或 pppoe pass through)的需求, 也就是希望在RB750GL後的設備, 平常可以以DHCP方式取得private ip, 透過RB750GL的固一IP上網, 若有需要時, 只要改以 pppoe 撥號, 就可以取得 浮7的public ip 上網.
我對外是一線100M 的FTTH , 接在eth1上, eth2接一台8ports的switch hub, eth3接一台純AP, eth4, eth5 分別接一台NB及桌機, eth2 為 master, eth3~5 為slave, master皆指向eth2.
入手RB750GL後, 上網找了許久的資料, 大部份都是講如何合併2個的WAN的資料居多, 都沒看到類似我問題的實作方式,
胡亂試了一些方法, 如bridge, eoip, 但總不成功.
不得已, 只好冒味請教茶包兄, 還請茶包兄指點一下方向, 我再來試試看, 感謝!
to angp
我分享一下我的做法
方法一:
1.PC or HUB接一條線到VDSL數據機上面
2.RB750GL(假設為Port 1)接一條線到VDSL數據機上面
3.RB750GL上,把DHCP設到Port 1上
4.PC or NB把Gateway設到RB750GL Port1 所設定的IP
5.完成
方法二:
1.RB750GL Port 2~5 任選一孔接VDSL數據機
2.RB750GL Port 2~5 任選一孔接NB or PC
3.DHCP與PPPoE撥號記得自行設定
4.完成
註:使用方法二時,如果要使用Port 1,請bridge起來
謝謝茶包兄的回答, 過年後,反而開工後才有時間來測試.. 🙁
關於方法一的第4點有點奇怪, 以我使用的ONU FTE6075來說, 我把RB750GL的port1 接到 FTE6075 的port1, 使用pppoe 取得對外的 public ip, 同時也設好 dhcp server 在 RB750GL 的 port1上, 再將NB 接到 FTE6075的 port2, 但這時NB是無法透過DHCP取得ip, 即時手動設固定IP, 也無法ping到 port1 的RB750GL,
而且這邊有個疑問, 既然要使用DHCP方式, 為什麼在NB上還要手動把Gateway設到 RB750GL呢? (我有試過手動在NB上設gateway及IP, 但ping不到RB750GL),
以上是不是我誤會了某些動作? 還請茶包兄解惑, 謝謝!
因為時間的關係, 方法二我明天下班後回來再試, 感謝!
剛才回家後就迫不急待地試了方法二,
按照步驟設好, 第一次就成功了 ^_^ 十分感謝茶包兄…
我把RB750GL的port2 接到VDSL ( port2 設pppoe撥號+dhcp server)
RB750GL的port3接到NB
RB750GL的port4接到switch , 再接3台 desktop
這4台都可以使用dhcp 取得 private ip上網, 也可以自行 pppoe 撥上取得public ip上網,
雖然方法二成功了, 不過, 想請問茶包兄, 方法二有什麼缺點嗎?
感覺方法一應該比較”正統”, 但剛才反覆再試了幾回, 仍無法順利連線 🙁
另外, 我在方法二上參考你的blog文章想設upnp, 我把 port2上的 pppoe介面設為 external 的 upnp , 另外在 port3, port4 設為 internal 的 upnp, 但NB,桌機上的軟體都無法使用unpn 連線, 不知道是否有哪裡需要注意的呢? 謝謝!
唉, 好景不常, 剛剛持續在測試方法二, 發現大概不過5分鐘後, 整個連線速度大減, 本來對外的100M/10M會減至10M/10M, 去查設定, 發現ethernet被限制在10Mbps, 但如果手動調整為100Mbps後, 不一會兒, 連燈都熄了, 看樣子應該是封包碰撞的關係, 但因為功力太淺, 不知道該如何設定, 只好先將設定全回復原狀了…Orz
不過, UPNP我倒是設定成功了, 原來假設 pppoe 是在 port2 的話, 則是要將pppoe 介面設為 external, 而將同port2 設為 internal upnp , 我之前都是設到其它 port 去, 所以才不能動作, 這點提供給大家參考… 🙂
再來補一篇
昨晚不死心, 繼續找資料測試, 後來在pczone看到一篇文章介紹的方法,
自己照著改接如下:
1.RB750GL port1 接到 VDSL (port1 開 pppoe + dhcp server)
2.RB750GL port2 為 master, port3~port5 為 slave
3.RB750GL port2 接 switch -> 3 台PC + NB + 網樂通
4.RB750GL port3 接 wireless AP (在AP上設為純 bridge, 關閉NAT及DHCP)
5.RB750GL port4 接 NB
6.RB750GL port5 再接到 VDSL
7.RB750GL pppoe 介面設 external upnp, port1 介面設 internal upnp
這樣測試結果, 雖然多浪費了RB750GL一個port, vdsl也少了一個可用的port,
但每台PC,NB 可以直接DHCP 取得 private ip上網, 若有需求的話, 也可以直接 pppoe 撥號, 取得 public ip 上網.
觀察一陣子後, 每台PC上網速度都還能維持 92M/9M 左右, 看起來應該符合我的要求了 ^_^
再次謝謝茶包兄的文章, 讓我獲得寶貴的知識及經驗, 省去了許多的學習時間..
以上設定也供大家參考, 如果有需要 pppoe relay 或稱 pppoe pass throughput 可以參考上面那種設定方式囉.
to angp:
其實RB750的Port 1是自已獨立一個LAN Port,而pppoe要撥號時,會發廣播的封包去找VDSL,所以如果預設Port 1沒有bridge到Port 2的話,基本上Port 2~5是無法播接pppoe成功的。
所以如果你想把浪費的那個Port拿來用的話,其實你只要把Port 1 與Port 2 Bridge起來就行了,其他的設定就跟38篇一樣。
方法1的原理其實很簡單就只是單純的把RB750當成Gateway與DHCP Server而已
當然如果你設備多的話,就比較不適用方法1了
有幫到你,我也很高興啦,我也是還在學習ROS中~~~
有問題也歡迎大家一起討論
/ip firewall mangle
add action=mark-connection chain=input comment=”” connection-state=new \
disabled=no in-interface=ISP1 new-connection-mark=ISP1_conn passthrough=\
yes
add action=mark-routing chain=output comment=”” connection-mark=ISP1_conn \
disabled=no new-routing-mark=to_ISP1 passthrough=no
add action=mark-connection chain=input comment=”” connection-state=new \
disabled=no in-interface=ISP2 new-connection-mark=ISP2_conn passthrough=\
yes
add action=mark-routing chain=output comment=”” connection-mark=ISP2_conn \
disabled=no new-routing-mark=to_ISP2 passthrough=no
這個規則做了以後,還是不能解決內網迴流問題?請教了!
請問設定好的rb450g要怎樣匯出腳本或內部設定呢?我是新手
to 樂樂:
用winbox連進去後,左邊選單 Files -> Backup 按下去就備份了
我照這設定 都會進入webfig 沒辦法port mapping 這是什原因呢??
to 樂樂:
應該是沒有設定好,要玩ROS也是要做一點功課
玩ROS網路的概念一定要有,不然會後痛苦的
可以幫我看一下有什問題嗎/????
這是改自大哥您的script檔
/interface pppoe-client
add ac-name=”” add-default-route=no allow=pap,chap,mschap1,mschap2 \
dial-on-demand=no disabled=no interface=ether1-gateway max-mru=1480 max-mtu=1480 \
mrru=disabled name=ISP1 password=123 profile=default service-name=”” \
use-peer-dns=no user=73999016@hinet.net
add ac-name=”” add-default-route=no allow=pap,chap,mschap1,mschap2 \
dial-on-demand=no disabled=no interface=ether5-gateway max-mru=1480 max-mtu=1480 \
mrru=disabled name=ISP2 password=123 profile=default service-name=”” \
use-peer-dns=no user=73999344@hinet.net
/ip firewall mangle
add action=mark-connection chain=prerouting disabled=no in-interface=ISP1 \
new-connection-mark=ISP1_conn passthrough=yes
add action=mark-connection chain=prerouting disabled=no in-interface=ISP2 \
new-connection-mark=ISP2_conn passthrough=yes
add action=mark-routing chain=prerouting connection-mark=ISP1_conn disabled=no \
in-interface=ether1-gateway new-routing-mark=to_ISP1 passthrough=yes src-address=\
192.168.88.252
add action=mark-routing chain=prerouting connection-mark=ISP2_conn disabled=no \
in-interface=ether5-gateway new-routing-mark=to_ISP2 passthrough=yes src-address=\
192.168.88.252
/ip firewall nat
add action=dst-nat chain=dstnat disabled=no dst-port=80 in-interface=ISP1 \
protocol=tcp to-addresses=192.168.88.252 to-ports=80
add action=dst-nat chain=dstnat disabled=no dst-port=80 in-interface=ISP2 \
protocol=tcp to-addresses=192.168.88.252 to-ports=80
add action=masquerade chain=srcnat disabled=no out-interface=ISP1
add action=masquerade chain=srcnat disabled=no out-interface=ISP2
/ip route
add disabled=no distance=1 dst-address=0.0.0.0/0 gateway=ISP2 routing-mark=\
to_ISP2 scope=30 target-scope=10
add disabled=no distance=1 dst-address=0.0.0.0/0 gateway=ISP1 routing-mark=\
to_ISP1 scope=30 target-scope=10
add disabled=no distance=1 dst-address=0.0.0.0/0 gateway=ISP2,ISP1 scope=30 \
target-scope=10
我是用pppoe上網取得ip來架站…..會不會是動態ip有特別的設定呢???不然端口映射都做不起來
to 樂樂:
抱歉,最近因工作比較忙,這麼晚才回
看了一下,有可能是這邊的問題,沒詳細測,可能你要實際試試看
add action=mark-routing chain=prerouting connection-mark=ISP1_conn disabled=no \
in-interface=ether1-gateway new-routing-mark=to_ISP1 passthrough=yes src-address=\
192.168.88.252
add action=mark-routing chain=prerouting connection-mark=ISP2_conn disabled=no \
in-interface=ether5-gateway new-routing-mark=to_ISP2 passthrough=yes src-address=\
192.168.88.252
————————————————–
in-interface=ether1-gateway
in-interface=ether5-gateway
上面這2個改成你內部Server所連接的Port,應該會是同一個Port
你好,
想請問一下,如何設定port mirror的運作方式呢?
我打算買RB750
找了好多www,都沒有相關的訊息。
to Lei:
Port Mirroring可參考官網
http://wiki.mikrotik.com/wiki/Manual:Switch_Chip_Features
購買的話,可以去拍賣找找看。或台灣的代理
茶包兄你好,
基本上我照你的script做,除了修改
interface=LAN -> interface=ether1-gateway
192.168.55.200 -> 192.168.1.222
然後..
ADSL與RB450G接在eth1
PC(192.168.1.222)接在eth2
但是碰到到很奇怪的問題,就是2個pppoe取得的IP,只有一個能連到PC的httpd,若把連的到的給暫時關掉,另一個IP才能連進來,請問設定上有什麼
可能問題嗎?
to 歐塔:
如果有1條以上的pppoe,則還要考慮firewall 裡面 mangle的回流封包設定
茶包兄您好:
不好意思打擾您了…
小弟日前在M網上看到茶包大的RB750GL開箱文,近期也敗了一台,在貴站上學到了不好,受益良多…
只是小弟還只是個非常遜咖的初學者,想請教一下茶包大…
設備如下:
CABLE ISP業者提供八個浮動IP,想運用其中五個IP(不需pppoe撥即可取得),故利用VRRP虛擬功能來抓,
各PORT連結如下:
PORT1 設WAN,接WAN 下開啟四個VRRP(原先八個)分別抓到IP為:A、B、C、D、E(為外部IP)
PORT2 設LAN,接交換器,底下接一般電腦(192.168.1.10-192.168.1.20)
PORT3 設server1,接server1(192.168.1.2)
PORT4 設server1,接server2(192.168.1.3)
PORT5 設wifi,接TP-LINK 1043 無線路由(底下接無線設備192.168.1-50-60及監視器一台192.168.1.100)
構想:
1、利用routeros dhcp server對應各設備的mac位址,並依ip連接區網
2、server1使用A IP、server2使用B IP出去(二台伺服器本身具DDNS功能,會自動依IP連網域)
3、監視器使用C IP出去
4、一般電腦使用 D IP 出去
5、無線設備使用 E IP 出去
步驟:
1.在interfaces裡面的vrrp設定了四個,並透過ether1連到WAN端(wan port1),設ether3-5為slave
2.在ip adderss裡增加192.168.1.1/24 interface=ether2(lan port2)
3.在ip adderss裡增加192.168.0.1/24 interface=vrrp1(192.168.0.2/24 interface=vrrp2至vrrp4)
第3項沒設,vrrp好像沒辦法抓到ip,這項很怪,後面是有停用了,但還是保留著,可能跟wan端的數據器有關吧?
4.dhcp client裡設定 add interface=ether1、interface=vrrp1、interface=vrrp2、interface=vrrp3、interface=vrrp4
5.dhcp server裡設定 add leases各IP及MAC對照表、名稱等
6.ISP業者數據機(小烏龜)重啟後routeros會取得到五組ip,ether1 wan 1個、vrrp1-4 4個,共5個
7.pool有設定192.168.1.2-192.168.1.100為dhcp ip範圍
8.firewall裡nat設定 general chain=dstnat dst address=B IP action=dst-nat to addresses=192.168.1.2 server1設定移至第1
9.firewall裡nat設定 general chain=dstnat dst address=C IP action=dst-nat to addresses=192.168.1.3 server2設定移至第2
10.firewall裡nat設定 general chain=srcnat dst action=masquerade 設定移至第2
之後就不太會設了,只知打了A IP後可由一般電腦進入server 1,而電腦出去的ip與server 1出去的ip相同,
所server1出去後取得的DDNS會與server2的DDNS IP相同…
小弟平時只會設定一般家用路由,所以請茶包大予以指導,感激不盡…
to Necos:
VRRP一般是拿來做網路的容錯使用,即多個Router備援,
是否可以拿來像你文中的方式使用,我想可能你要花時間試試看。
我自己有小試一下,VRRP似乎無法使用DHCP Client來自動取得IP位置(也許是我網路環境的問題)。
排除以上問題,假設你已經取得IP位置了。
需要注意的地方為這幾個IP的Gateway IP是否為同一個位置(一般來說會是同一個),
這時候我們雖然已經在nat裡面設定某個線路進來的轉址到內部的某個IP位置 or Port,
但重點在於該內部Server所回傳的封包並沒有指定要走那一條線路回去,一般剛玩ROS的都會卡在這邊。
所以除了在nat中指定轉IP or Port之外,也需要在mangle中指定內部那一個Server過來的封包,
要走那一條線路出去,這樣子才算完成(當然你的routing table中也要設定完成)。
以上也許沒有直接幫到你的忙,但也提供了一條思路,供你參考參考。
真是太感謝茶包大的指導,於是小弟嘗試著亂增加了幾個標記mangle現在搞的有點亂…
設定圖給茶包大檢閱一下,設定的相關圖址連結:
http://ypix.me/LAWG/
構想是第八張
再請教一下茶包大:像小弟要讓二台server取得獨立IP(以該伺服器的MAC配IP),單獨出入,但又要在區網內192.168.1.0/24內都可以看到,他們的port interface要slave到lan端再設嗎?是否還有別的方式?像是放二台server在二台路由的DMZ裡面…
好像愈搞愈亂了…@@
因為沒有PPPOE撥號,所以只能用vrrp來取得ISP提供的IP,除了這方法之外是否還有別的方式也可以抓到ISP業者提供的所有IP?
感謝茶包大抽空指導…
to Necos:
如果VRRP可以抓到IP的那,那就直接用吧。
我剛大略的看了一下,routing table那邊似乎沒有設到routing mark,
你的圖3中,有變成藍色的rule表是沒有做用。
我提供自己RouterOS上的比較關鍵的幾條規則供你參考。
單獨出入的問題,於mangle中綁定routing mark就可以了。
/ip firewall mangle
add action=mark-routing chain=prerouting comment=”NAT Mapping (minitw)” connection-state=established
disabled=no new-routing-mark=to_adsl_2 passthrough=no src-address=Server的IP位置
/ip firewall nat
add action=masquerade chain=srcnat disabled=no out-interface=ADSL-2 routing-mark=to_adsl_2
/ip route
add disabled=no distance=1 dst-address=0.0.0.0/0 gateway=ADSL-2 routing-mark=to_adsl_2 sc
target-scope=10
這個問題的關鍵在於/ip firewall mangle
可以設定為A線路進來的就打上「A_Connection」這個標記(mark connection)
然後也在/ip route裡面設定當發現有「A_Connection」就走A線路的Gateway出去
這個邏輯我理解,也照著設定,但還是沒有得到我想要的結果
我的問題是, 兩個 WAN 的 Gateway 是一樣的,都是 Fixed IP
我希望 VPN 從 WAN1 進來的,連上 http://www.whatismyip.com 看到的就是 WAN1 的 IP
而 VPN 從 WAN2 進來的,連上 http://www.whatismyip.com 看到的就是 WAN2 的 IP
這有沒有辦法做到呢?
to Gemma:
VPN進來後,主控權已經在ROS上面了。
所以應該可以使用NAT裡面的轉跳功能(chain是dsnat)。
例如當發現某個VPN內的IP要連線到某個Domain的IP時,就自動轉到另一個IP或Port上面。如此應該可以解決你的問題。
所以我建議你依VPN進來後,所核發的IP進行管理,方便日後的轉跳動作。
下面給一個例子供參考:
/ip firewall nat
add action=dst-nat chain=dstnat disabled=no dst-port=5900 in-interface=ADSL-1 \
protocol=tcp to-addresses=192.168.1.66 to-ports=5900
上面的例子是指,從ADSL-1進來的連線,如果要連到5900這個Port就自動轉到192.168.1.66的5900 Port上面。依你的需求就是把Port拿掉加上IP的部份。
您好!我照您的方式加了這一行
add action=dst-nat chain=dstnat disabled=no in-interface=wan2 protocol=tcp to-addresses=192.168.88.100-192.168.88.150
其中 192.168.88.100-192.168.88.150 是我給 VPN 的 IP Pool
結果 VPN 就撥不進去了
幸好兩個 WAN 只先改了一個,還有另一個可以進去改設定
to Gemma:
規則的思路應該是:如果有192.168.88.100-192.168.88.150區間的IP要連線到8.8.8.8(範例),就自動轉跳到10.10.10.10(範例)。
詳細的設定細節,可能要請你研究試試囉。
照這樣的思路規則,而且考慮需要先告訴 RouterOS 這個連線是從 WAN1 還是 WAN2 進來
我的設定是
/ip firewall mangle
add action=mark-connection chain=input connection-state=new disabled=no in-interface=wan2 new-connection-mark=from_wan2 passthrough=yes
/ip firewall nat
add action=dst-nat chain=dstnat connection-mark=from_wan2 disabled=no dst-address=0.0.0.0/0 protocol=tcp src-address-list=VPN to-addresses=WAN2_IP
其中 VPN 是我給 VPN 的 IP 範圍
結果一樣是不行
而且
to Gemma:
應該是不用管in-interface。只需要判斷IP即可。
需要管 in-interface 呀!因為 VPN 可能從 WAN1 進來也可能從 WAN2 進來
因為 PPTP Server 只有一個,所以取得 IP 是一樣的範圍
但是我希望從 WAN1 IP 連進來的顯示的對外 IP 就是 WAN1 IP、從 WAN2 IP 連進來的顯示的對外 IP 就是 WAN2 IP
不好意思,想請問一下,我的RouterOS系統是安裝在VMWare上,現在我的配置是一個管理介面,一個wan給pppoe撥號,一個lan設定dhcp讓某一網段上網,但是現在我測試到Firewall的地方就卡死了,無論NAT怎麼設定不是無法上網,就是用Action=masquerade的話就從我的管理ip的網段上網,我的NAT和Mangle是參照本篇上面去做修改的,不知道是否還有什麼地方需要增加或修改?
to Gemma:
我的意思是指由vpn進來的帳號判斷,去給IP區間(設定IP pool),然後就是依照IP的區間不同,進行不一樣的轉址。
假設:
帳號a1、a2、a3,vpn進來的,IP就給在192.168.1.1 ~ 192.168.1.10之間。
帳號b1、b2、b3,vpn進來的,IP就給在192.168.1.11 ~ 192.168.1.20之間。
ROS發現來源為192.168.1.1 ~ 192.168.1.10區間的IP要連線到8.8.8.8,
自動轉跳到10.10.10.10。
ROS發現來源為192.168.1.11 ~ 192.168.1.20區間的IP要連線到8.8.8.8,
自動轉跳到20.20.20.20。
to David:
請確認你的VMWare內的網卡為Bridge模式。
這不是我想要的
我想要的是不管什麼帳號只要 VPN 從 Wan1 進來的就從 Wan1 出、Wan2 進來的就從 Wan2 出
如果單純4wan進來,不用撥號.
這樣要如何設定?
麻煩先輩指導了…
to johnny:
如果你的網路不需透過PPPoE撥號。那就是只直接走routing或nat的方式。
茶包兄,我的兩條線 都是DHCP 的, 以下設定,外面也不能進入我的server , 我的其他電腦上網有問題
請幫忙看下,感謝
/ip dhcp-client
add add-default-route=no disabled=no interface=wan1 use-peer-dns=no use-peer-ntp=yes
add add-default-route=no disabled=no interface=wan2 use-peer-dns=no use-peer-ntp=yes
/ip firewall mangle
add action=mark-connection chain=prerouting disabled=yes in-interface=wan1 new-connection-mark=WAN1_conn passthrough=yes
add action=mark-connection chain=prerouting disabled=yes in-interface=wan2 new-connection-mark=WAN2_conn passthrough=yes
add action=mark-routing chain=prerouting connection-mark=WAN1_conn disabled=yes in-interface=bridge-local new-routing-mark=to_WAN1 passthrough=yes src-address=192.168.200.2
add action=mark-routing chain=prerouting connection-mark=WAN2_conn disabled=yes in-interface=bridge-local new-routing-mark=to_WAN2 passthrough=yes src-address=192.168.200.2
/ip firewall nat
add action=dst-nat chain=dstnat disabled=no dst-port=9981 in-interface=wan1 protocol=tcp to-addresses=192.168.200.2 to-ports=9981
add action=dst-nat chain=dstnat disabled=no dst-port=9981 in-interface=wan2 protocol=tcp to-addresses=192.168.200.2 to-ports=9981
add action=dst-nat chain=dstnat disabled=no dst-port=9982 in-interface=wan1 protocol=tcp to-addresses=192.168.200.2 to-ports=9982
add action=dst-nat chain=dstnat disabled=no dst-port=9982 in-interface=wan2 protocol=tcp to-addresses=192.168.200.2 to-ports=9982
add action=masquerade chain=srcnat disabled=no out-interface=wan1
add action=masquerade chain=srcnat disabled=no out-interface=wan2
/ip route
add disabled=no distance=1 dst-address=0.0.0.0/0 gateway=wan1 routing-mark=”To wan1″ scope=30 target-scope=10
add disabled=no distance=1 dst-address=0.0.0.0/0 gateway=wan2 routing-mark=”To wan2″ scope=30 target-scope=10
add disabled=no distance=1 dst-address=0.0.0.0/0 gateway=wan1,wan2 scope=30 target-scope=10
to Kenny:
雙線的部份會比較難弄一點,建議你可以先從單一條網路開始弄。
再來,如果你的WAN也是DHCP取得的內部虛擬IP,那DHCP Server那台的NAT轉換也必需要開啟才有辦法。
如果你的WAN DHCP取得的是外部真實IP,那可以參考這篇最上面文章中的解法。
To Jason,
我的 Wan DHCP 是外部真實IP,我的這些設定就是參考上面的文章的
不知道為何 會有問題,我的
to kenny:
先把問題簡化,先做1條線就好。
先把1條線搞定,讓內部可以連外,外面的也可以連入。
之後再來玩2線的。
to Jason,
你說得對,我一條條的來設,
action=mark-connection chain=prerouting disabled=no in-interface=wan1 new-connection-mark=WAN1_conn passthrough=yes
add action=mark-routing chain=prerouting connection-mark=WAN1_conn disabled=no in-interface=bridge-local new-routing-mark=to_WAN1 passthrough=yes src-address=192.168.200.2
add action=dst-nat chain=dstnat disabled=no dst-port=20-21 in-interface=wan1 protocol=tcp to-addresses=192.168.200.2 to-ports=20-21
做完下面這條後, 外面就進不了FTP。
add disabled=no distance=1 dst-address=0.0.0.0/0 gateway=WAN1 routing-mark=to_WAN1 scope=30 target-scope=10
to kenny:
建議可以先用80 port比較單純來做測試。
我把本篇上面的範例處理成單一條線,你把IP與參數改成你想要的,測試看看
/ip firewall mangle
add action=mark-connection chain=prerouting disabled=no in-interface=ISP1 \
new-connection-mark=ISP1_conn passthrough=yes
add action=mark-routing chain=prerouting connection-mark=ISP1_conn disabled=no \
in-interface=LAN new-routing-mark=to_ISP1 passthrough=yes src-address=\
192.168.55.200
/ip firewall nat
add action=dst-nat chain=dstnat disabled=no dst-port=80 in-interface=ISP1 \
protocol=tcp to-addresses=192.168.55.200 to-ports=80
add action=masquerade chain=srcnat disabled=no out-interface=ISP1
/ip route
add disabled=no distance=1 dst-address=0.0.0.0/0 gateway=ISP1 routing-mark=\
to_ISP1 scope=30 target-scope=10
add disabled=no distance=1 dst-address=0.0.0.0/0 gateway=ISP2,ISP1 scope=30 \
target-scope=10